Discover, Learn, Explore with MunroandGlen.com
How to view and photograph / film the Northern Lights in Scotland
When the nights draw in, with a bit of pre-planning and luck, it is possible to see the natural wonder of the Aurora Borealis (more commonly known as the Northern Lights) from many parts of Scotland. Munro & Glen explains how you can see one of the greatest natural shows on Earth.
8/19/20255 min read

One great thing about being in Scotland in the autumn, winter and spring months is the high likelyhood of being able to see the beautiful, awe-inspiring Aurora Borealis or Northern Lights.
For some this is merely luck, though with a little bit of pre-planning, it is possible to get a good seat at the show, so to speak. It is possible to see the Northern Lights from all over Scotland (and sometimes it is possible to see them in Cornwall!), so no matter where you happen to be, it is just a matter of clear skies and the right conditions of the Sun to produce the phenomena.
Though how does one know when the aurora will be visible? Well, the best way is to get one of the many smartphone apps which collate scientific data and alert you as to when there is a high probability of witnessing this amazing natural phenomena.
My own go-to is AuroraWatch UK - which is operated by the astronomers at the Space and Planetary Physics Group at Lancaster University. This free app (available for Apple iOS and Android) and web site provides alerts in yellow (low probability of seeing an aurora), orange (usually you will see a good aurora event) and red (where you are almost guaranteed a very spectacular display of the Northern Lights). It works on most devices and also on smart watches. There are many other apps available, though mostly provide very similar info to AuroraWatch UK and charge a fee and perhaps are more useful when travelling abroad.
Auroras are the result of mass coronal ejections from our star, Sol (more commonly known as the Sun) and often there will be activity over a few nights. So your app may show yellow, which can change to orange. Personally, I mostly only react when the alert is orange or red. It is imperative to react fairly quickly to an alert. Hence, it is a good idea to have a look at the map of your local area and find a few spots which would give you a good view. Thus pre-planned (it is also advisable to pre-pack your camera bag and tripod), upon receiving the alert, one can dash off to the location and usually see an wonderful display of the auroras in the night sky.
Even if there is a bit of cloud and some stars are visible, then it may be worth heading out. Obviously, checking a weather app such as BBC Weather or the UK Met Office helps to figure out if the clouds will clear or obscure any possible view. I find the UK Met Office app more accurate than the BBC Weather one.
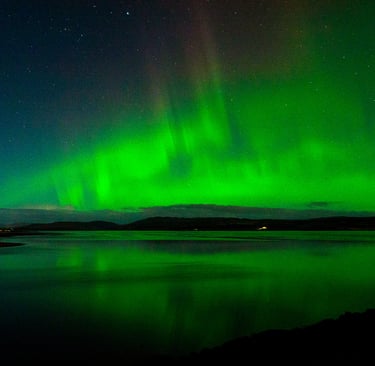
The Northern Lights over the Dornoch Firth in the far north of Scotland. The alert on that night was orange and has a spiky structure - Photo: Jonathan Mitchell
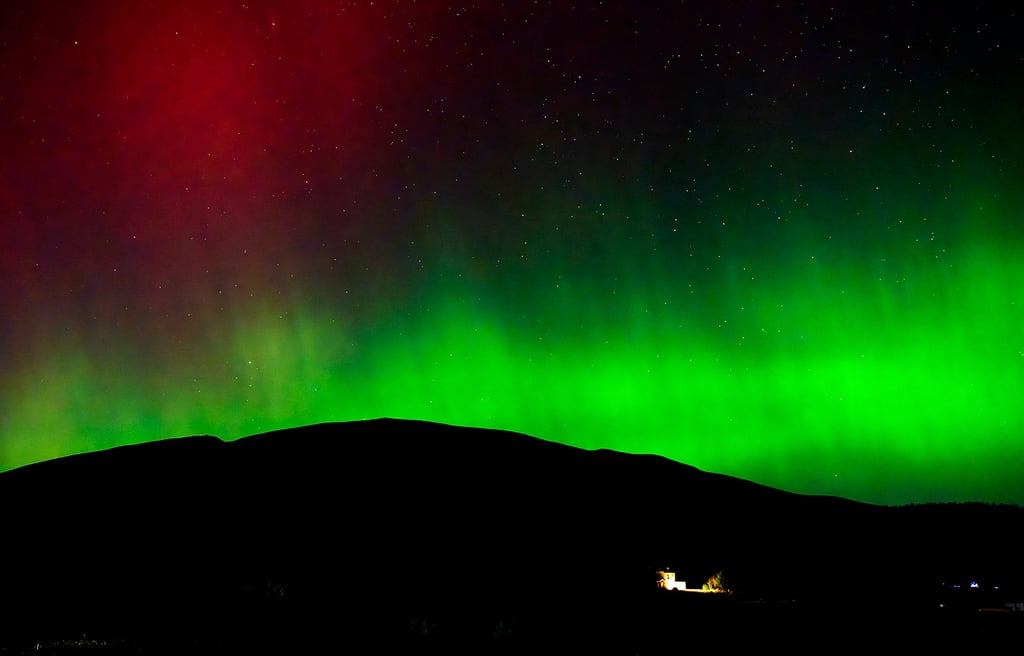
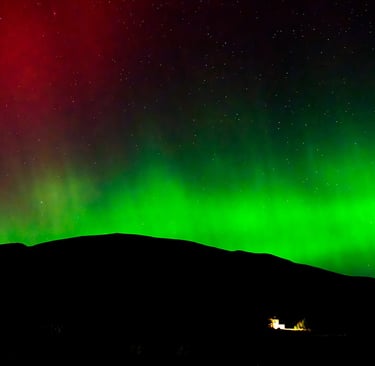
This is usually what an aurora looks like with high orange/red activity on the graph on the app. Nature and wildlife photographer Keith Ringland captured this image in the Cairngorms National Park in the Scottish Highlands, seeing both a red (somewhat rare) and green aurora - Photo: Keith Ringland
In choosing nearby locations to potentially witness an aurora event, it generally needs to be a view to the north. Personally, I always try to find locations where the foreground will be a loch, inlet or bay, as then one can see the reflection of the aurora in the water. A dramatic landscape helps too, such as a coastal headland or a good viewpoint over a loch or mountains.
Ordnance Survey maps are particularly useful for finding locations and not a bad idea to rock up at potential locations and check the viewpoints beforehand. Mostly it is best to photograph or film the Northern Lights with a wide-angle lens. A 28mm (35mm equivalent) lens is fine, though better with any wide-angle 16-24mm (in 35mm terms) lens. A large aperture lens can help. Autofocus on some cameras is tricky at night and a trick to get around this is to focus on a distant light to get the focus on infinity and then lock the focus or switch to manual.
Photographing and filming auroras is a little tricky, though it is a lot easier with high-spec camera equipment. I have seen some great images of the Northern Lights taken with smartphones, though mostly for night photography, larger sensors work better. A tripod is essential, though if you don't own one - a large bag of beans can be perched on a rock or wall or on top of a car and will provide similar results. It is often easy these days to pick up a simple tripod for very little or for free on a site like Trash Nothing. Tripods for smartphones are also inexpensive.
It is best to put the self-timer shutter release mode on, as to avoid any vibrations which could blur the whole image.
The image at the top of this page was taken on a Panasonic Lumix G3 at an aperture of f5 with an exposure of 10 seconds at 1600 ISO. The G3 produced a nice quality image from its Micro 4/3 sensor, though it is better to use a full-frame 35mm equivalent sensor if possible or failing that an APS-C sensor camera or Micro 4/3. This was pushing the camera to it's limits in terms of low light captures and image quality. Keith Ringland took the picture above with a high-end Sony α7R IV - which is a full-frame 35mm equivalent sensor - at 0.8/second exposure with an aperture of f5 at 102400 ISO. The big gain here is that this kind of camera has great performance in low light with excellent quality at very high ISOs. Exposures of 10 seconds and under will capture more of the detail in the aurora. This can be seen in the images I shot at the Dornoch Firth and Keith's picture (where the detailed structure of the aurora is a little more visible). Once beyond 10 seconds the aurora will be slightly blurred.
Should you not have any high-end kit like this, it is still possible to get interesting images at 15-30 seconds on 1600-6400 ISO and in some cases, your smartphone may have some night photography features that may produce a better image than the average DSLR camera. It does depend somewhat on the aurora one sees, as usually orange and red alerts are brighter.
Making a video of the Aurora Borealis is only possible in real-time with very high spec cameras and lenses with wide apertures of f1.4 to f2. Though again, some smartphones will handle it with ease. However, visually if you compile a time-lapse video, it will look quite similar. Many cameras - and indeed smartphones - have a time-lapse mode. As video is 24 frames per second, to get a good clip of 10-25 seconds, you just need to take a lot of pictures (if your camera lacks a time-lapse mode), then they can be post-processed into a film clip. So a 15 second clip would require 360 shots, etc.
Whether one chases what is one of the greatest, most spectacular and downright magical spectacles on Earth with cameras or without. If you get the right location and weather conditions, seeing the Aurora Borealis an unforgettable experience and well worth a small amount of pre-planning.